Ok, well maybe not cheap, but not ludicrously expensive either. I was able to get 4 gaming “computers” running on a single Ryzen desktop, and it actually works really well! Here’s the story of how I did it.
Background: 7 gamers 1 CPU
I blame my brother for getting me hooked on this idea. He kept talking about fancy new virtualization instructions that allowed for passing through PCI devices to a virtual machine, effectively giving it full and direct access to the hardware. Passing through a GPU to say a windows VM, would let you play a game with performance that was within a couple percent of native performance. Pretty crazy stuff. Maybe I could play my windows games in linux without all the troubles of running wine!
But then he showed me this and a follow up where they make a 7-in-1 gaming computer albeit with $30,000 worth of hardware. However, there wasn’t any reason you couldn’t do the same thing with cheaper consumer hardware. I was pretty skeptical of trying the idea at first (I’m the pessimist in my family in terms of project feasibility), but I was eventually convinced that I could get it working (and experiment with it) on my current (now old) not-super-fancy gaming computer without buying any fancy new hardware.
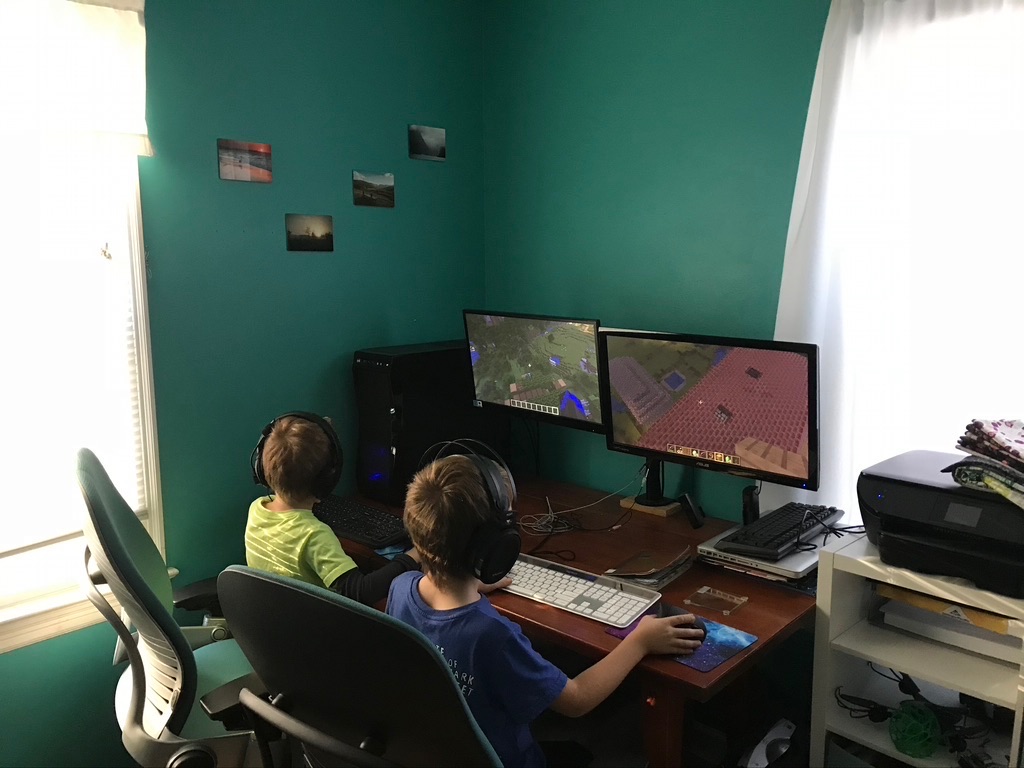
And I actually got it working!, with only one real GPU, an integrated GPU, and just 2 CPU cores. It was not ideal, but both my kids could play minecraft on the same computer at the same time, and they were very happy about it :)
There’s no reason one couldn’t just make a setup like this using KVM/QEMU on linux with only free software (and many people do, you can find some good instructions for that here), but I ended up using Unraid to do it. Unraid is still using KVM/QEMU on linux, but they have done a lot of extra work to make sure the kernel/KVM/QEMU have all the latest patches to work around the most common bugs and issues, and they have a nice web GUI that makes the basic VM setup and PCI passthrough super easy. I still ended up needing to do more fine-grained editing of my VM configs, but it’s so much easier to make a few tweaks on an already mostly working config, than it is to make a working config from scratch.
It turns out there are still a lot of gotcha’s and annoyances in building and operating a setup like this, and I was extremely lucky that I was able to get everything to work so well on my old computer. But I was hooked and decided that for my next gaming computer, I was going to do this properly.
Goals for my dream 4-in-1 computer:
Minecraft would run ok with only one core, but there was definitely some occasional stuttering. I needed more cores. At the very least I wanted to support 3 gamers at once, sometimes I want to play games when the kids are playing after all. And if I’m going to support 3, I might as well make it 4, so the whole family can play at once 🙂 So 4 GPUs, and say, at least 2 cores per-gamer + a few extra cores for things like a minecraft server 😀 12 cores ought to do it.
One particular annoyance with my previous setup was that USB devices don’t hotplug into VMs. If you disconnect a USB device that’s attached to a VM, you pretty much have to restart the VM if you want to re-attach it, which is pretty annoying. The best way to get around this is to passthrough a PCIe USB controller to the VM, then USB behaves just like you’d expect.
Around the same time I had been experimenting with streaming games from “the cloud” (AWS) either using the method here or using Parsec. The new nvenc hardware video encoders built into the latest Nvidia GPUs made the latency quite manageable. So I thought, why not “stream” the kid’s computers to anywhere in the house? That way I could put them anywhere I wanted, and I wouldn’t need any dedicated USB cards for those computers since the streaming software would handle the input virtually. This added a constraint that I needed at least a GTX1050 or later for my GPUs, as those are the oldest cards that have the nvenc support.
This was just after to the Ryzen Zen 2 release (but before the Threadripper release), so I could get lots of cores for not-too-ridiculous prices.
So the rough specs for my 4 gamer machine:
- At least 12 cores
- 4 GTX1050+ GPUs
- Extra PCIe slot for dedicated USB controller
Figuring out how to get 4 GPUs to run on consumer hardware
But one of the things you’ll notice when looking for Ryzen AM4 motherboards that have slots for 4 GPUs + a USB PCIe card, is that there aren’t any 😭
“Ah! that shouldn’t be a problem!”, I thought, “I’ll just wait for the the Zen 2 Threadripper release just around the corner, I can get Threadripper motherboards for everything I need, and they should have plenty of PCIe lanes to spare!”
But when the new Threadrippers were announced, the smallest of them was a 24-core $1500 monster, which was most of my budget in just one part. The Threadripper route was just too expensive 😢
I almost settled for just a 3 gamer build. A less crazy person might have, but this setup is already so crazy that I decided I wasn’t going let something simple like my motherboard not having enough slots stand in my way 😀
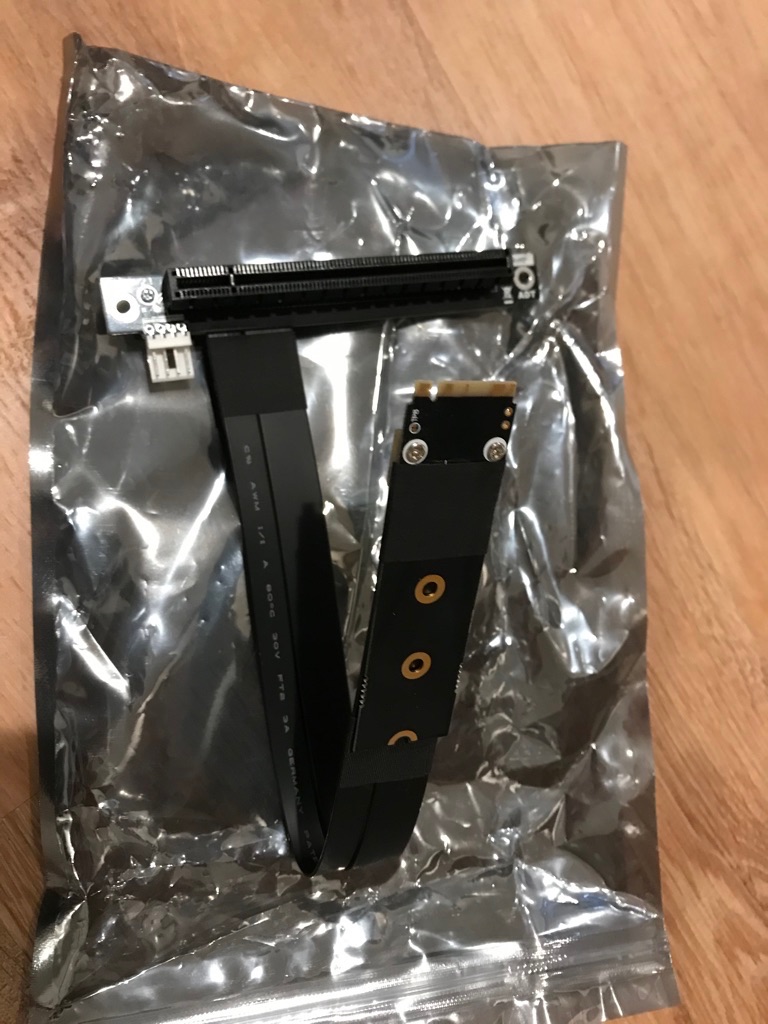
My solution to not having enough slots was to use this crazy m.2 to x16 adapter. But this added some extra constraints. I needed some extra M.2 slots (and ones that didn’t conflict with other PCIe slots, which some do). One might think that only having the 4 PCIe lanes provided to the M.2 slot might hinder performance, but it turns out there is essentially zero performance difference running GPUs at 4x vs 16x. This might change with latest RTX 3000 cards, but is still true for the moment.
The case
But there is actually another major problem. It turns out it’s really hard to get GTX 1050 or better GPUs that only take up the physical space of one PCI slot. So in term of physical PCI slot space, I need at least 4*2 (for GPUs) + 1 (for USB card) = 9 slots. The ATX standard (and even EATX) only specifies 7 slots. To make it even worse, all the AM4 motherboards I could find left the first physical PCI slot space unpopulated, I presume to ensure that the CPU cooler didn’t interfere with the primary GPU:
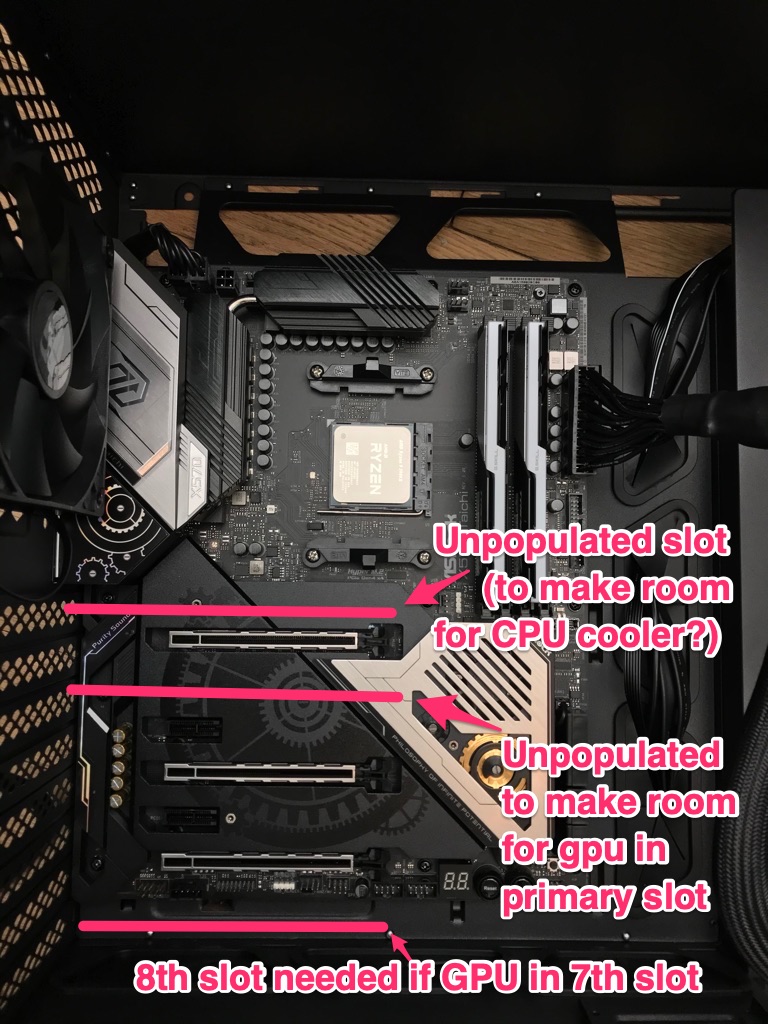
So that basically meant I needed a case with space for 10 PCI slots.
I solved this with a DEEPCOOL MACUBE 550 which has 8 PCI slot openings + 2 vertical mount PCI slots. It was in fact the only full-tower form factor case, that I could find anywhere, that had enough slots.
The Motherboard
One of the issues that used to be a major problem with older motherboards was that PCIe devices on the other side of the motherboard chipset from the CPU were all lumped into one IOMMU group. This essentially meant that you couldn’t passthrough any of those devices to a VM, at least without some hacky work-arounds, and sometimes not even then. Since the third x16 slot, and possibly the M.2 slot would have been driven from the motherboard, having some borked IOMMU groups would have really sunk the project. The ASRock X570 Taichi was pretty much the only motherboard that I could find that had the appropriate slot layout and had people that had posted it’s IOMMU groups online, confirming that the third x16 slot and all of the M.2 slots would be in their own IOMMU groups, which meant it would work for what I wanted. Also, just the fact that people were posting about it’s IOMMU groups that meant that lots of other people were doing similar crazy PCIe passthrough things with this motherboard, which would help googling problems if/when I ran into any.
(It turns out I needn’t have worried and pretty much any modern AMD motherboard will have decent IOMMU groups these days, but that wasn’t a given at the time)
The rest of the hardware config:
The rest of the hardware selection was pretty straightforward.
I decided to also use a M.2 drive for the storage for my primary gaming VM, and to pass the USB controller, the M.2, and a GPU to that VM. That way my main gaming “computer” has native performance for pretty much everything.
I don’t have enough M.2 slots (or PCIe lanes for that matter) to do that for all my gaming VMs so I used more normal disk images for the others, but spread them out over 3 SATA SSDs
I didn’t need move than 1 PCIe USB controller since I was going to stream the other three gaming VMs to “thin clients”.
After lots of experimentation I landed on using SteamLinks for the thin clients that interface with the other gaming VMs. I happened to have a couple lying around and they were by far the least buggy and best performing of all the options I tried.
I’m not streaming my primary gaming VM, that one is hooked up to monitor, keyboard, and mouse directly.
I also got some extra NAS drives. I mean if it’s already going to be 4 computers, why not also a NAS? I couldn’t help myself 😀
The final hardware:
- CPU: AMD RYZEN 9 3900X 12-Core 3.8 GHz ($520)
- COOLER: Noctua NH-D15 SE-AM4 ($90)
- MB: ASRock X570 TAICHI ($270)
- SSDs (for VMs mostly):
- Sabrent Rocket 2 TB M.2-2280 NVME ($250) For my primary gaming VM
- 2 x SAMSUNG 860 EVO Series 2.5” 500GB SATA ($140 total)
- 1 x leftover 500GB SATA SSD from old computer
- NAS Storage:
- 2 x 4TB WD Reds ($180 total)
- 2 x 4TB Seagate Ironwolf (leftover from old NAS)
- PSU: CORSAIR AX Series AX1000 ($270) The 1000W PSU turned out to be massive overkill. I track the power usage (from the AC plug) and I rarely go over 400W even with all VMs going full tilt. I think a 750W or maybe even a 650W would have been enough.
- RAM: G.SKILL Trident Z Neo 32GB (2 x 16GB) DDR4 3600 ($160)
- CASE: DEEPCOOL MACUBE 550 ($95)
- CASE FAN: Noctua NF-P12 redux-1700 ($14)
- GPU1: MSI GeForce GTX 1660 ($212)
- GPU2: MSI GeForce GTX 1650 SUPER ($160)
- GPU3: MSI Computer GTX 1060 ($140)
- GPU4: EVGA GeForce GTX 1060 (leftover from old computer)
- Inateck Superspeed 7 Ports PCI-E to USB 3.0 Expansion Card ($27)
- HDMI Dummy Plug Headless Ghost Display Emulator, 3Pack ($15) Turns out you really need these for headless streaming
- FLASH: SanDisk 32GB Cruzer Fit USB Flash Drive ($7) Boot drive for Unraid
- CRASY M.2 Adapter:
- ADT-Link M.2 NGFF NVMe Key M Extender Cable to PCIE x16 ($35)
- DEEPCOOL PCI-E x16 3.0 Black Extension Cable 250mm ($25)
- “Thin clients” (for remote gaming for the kids):
- 3 x Vitalitim Wireless Keyboard & Mouse ($85 total)
- 3 SteamLinks ($70 total)
- 3 ASUS VA229HR 22” 1920 x 1080 w/ Built-in Speakers ($240 total)
- Old monitor and keyboard and mouse left over from old computer
Total Cost: $3005 Pretty pricy, but I guess not terrible maybe for 4 gaming computers + a NAS? 🤷♂️
Putting it together:
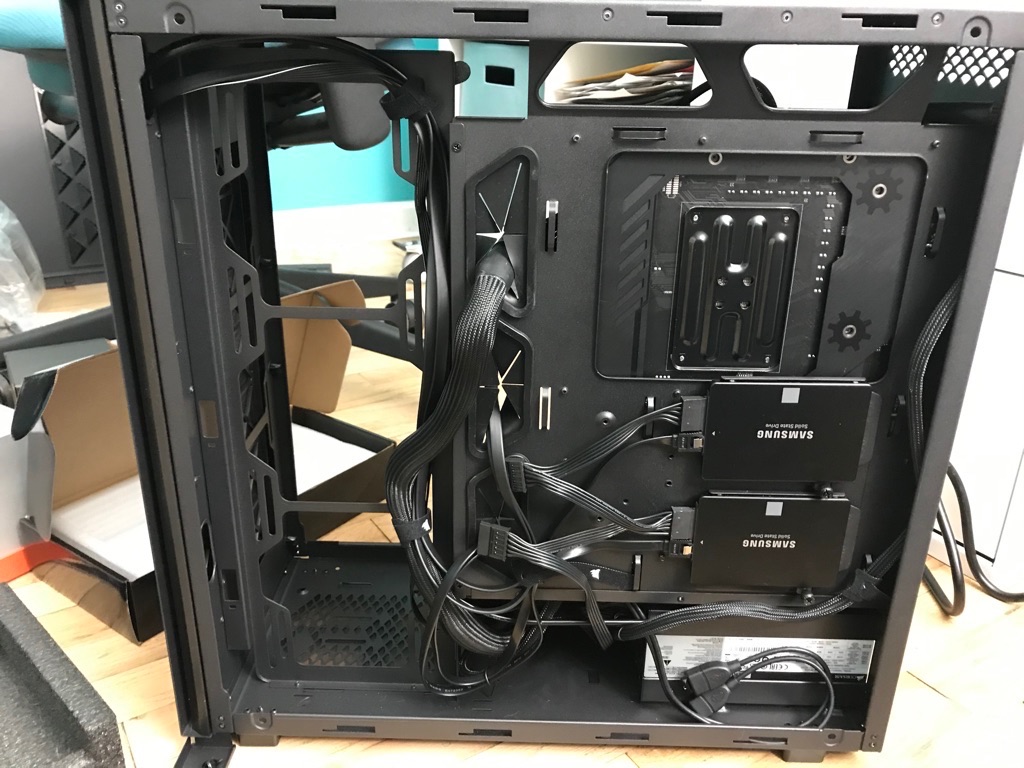
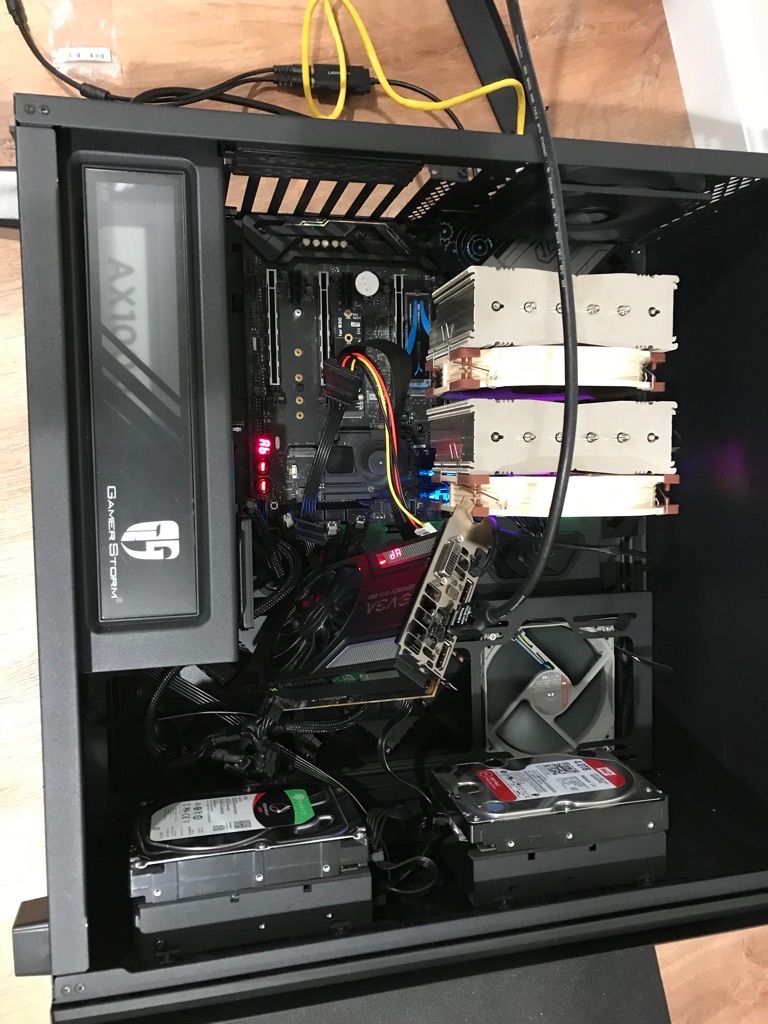
It took a week or two for the fancy M.2 to PCIe x16 adapter to arrive from China so I put everything else together first:

And a view from the back (taken before the above picture):
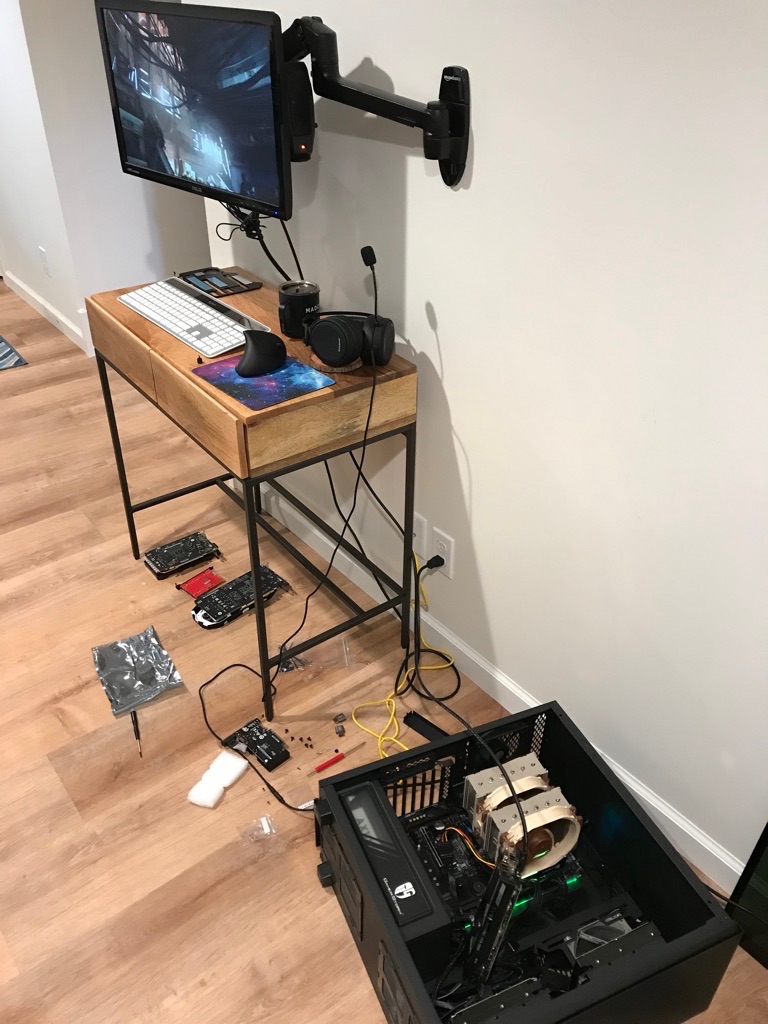
Then my fancy M.2 to PCIe x16 adapter came!:
Testing it!:
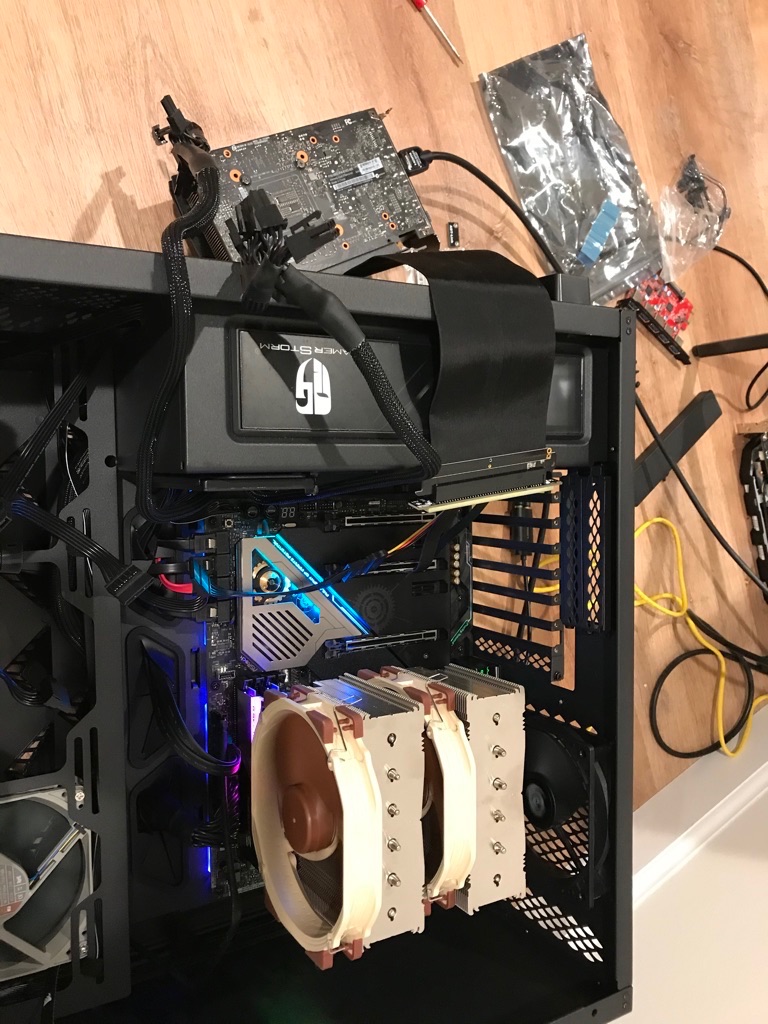
I was somewhat shocked to find that it worked perfectly! Deus Ex: Mankind Divided benchmark running via M.2 adapter:
Note that the adapter itself isn’t nearly long enough for me to put the GPU in the vertical slot where I want it, so I had to use the DEEPCOOL PCI-E x16 3.0 Black Extension Cable that’s designed for mounting a GPU in the vertical slot on DeepCool cases.
Testing with the extra extension cable:
Everything packed in!:
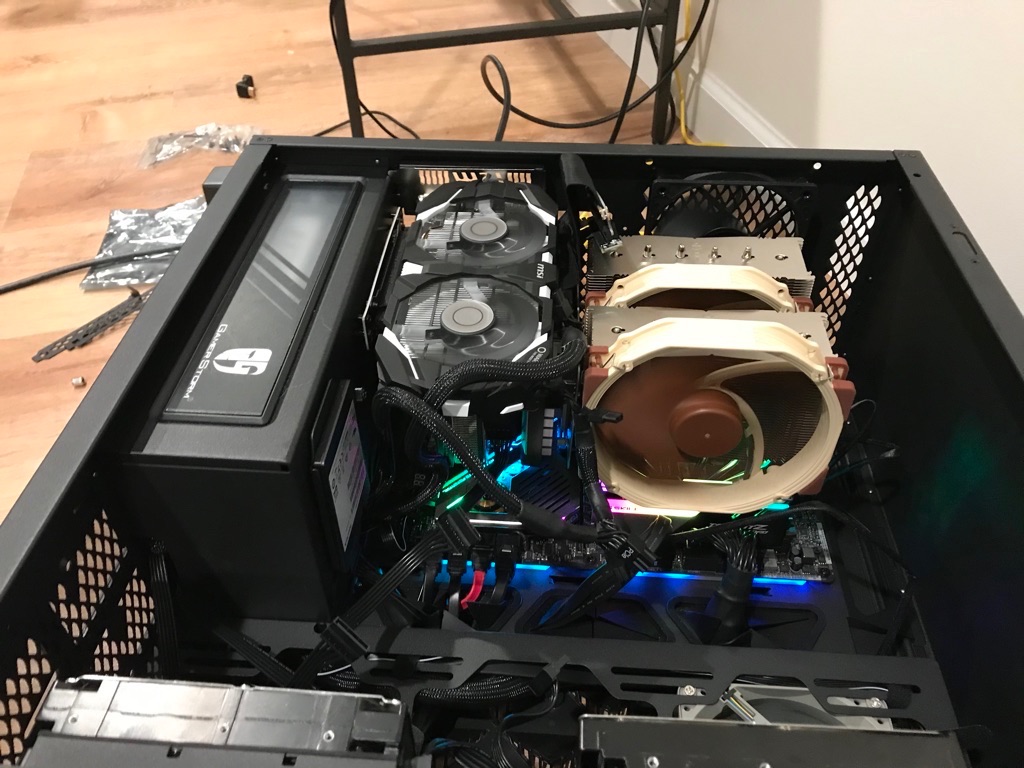
The adapter/extension cable by the CPU cooling fan is a bit ugly there, but the adapter is actually pretty high quality and there are no exposed conductors so I feel pretty safe with it like that.
Then I put my computer in the utility closet, with just power, ethernet, and USB and DisplayPort to my primary station:

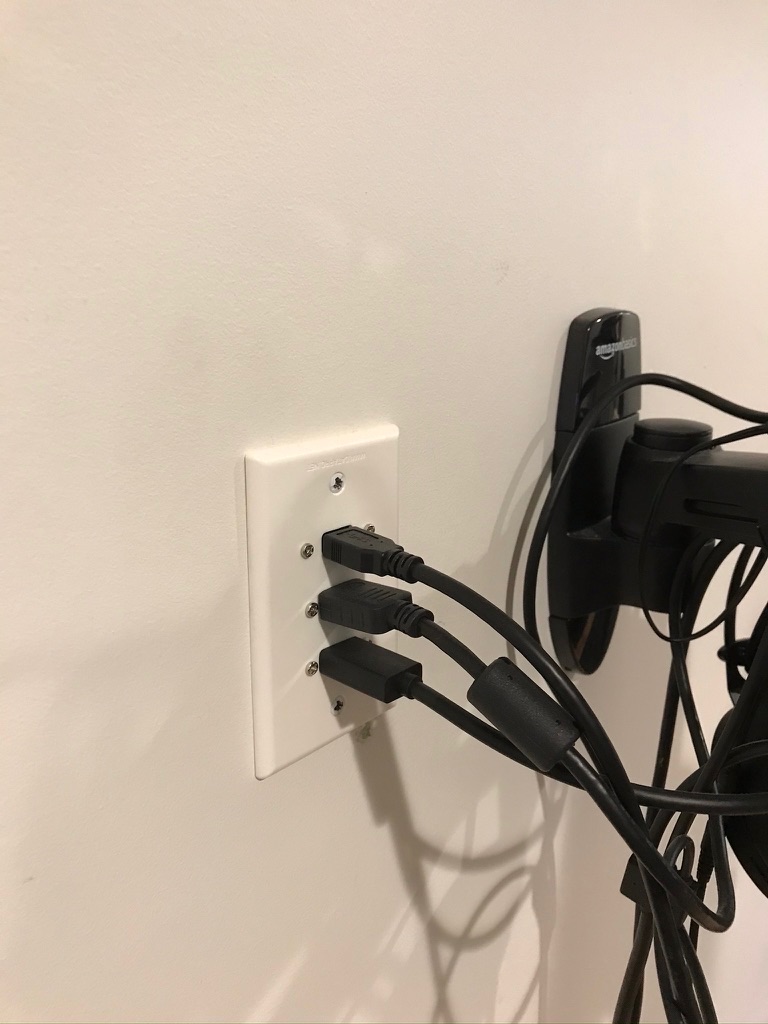
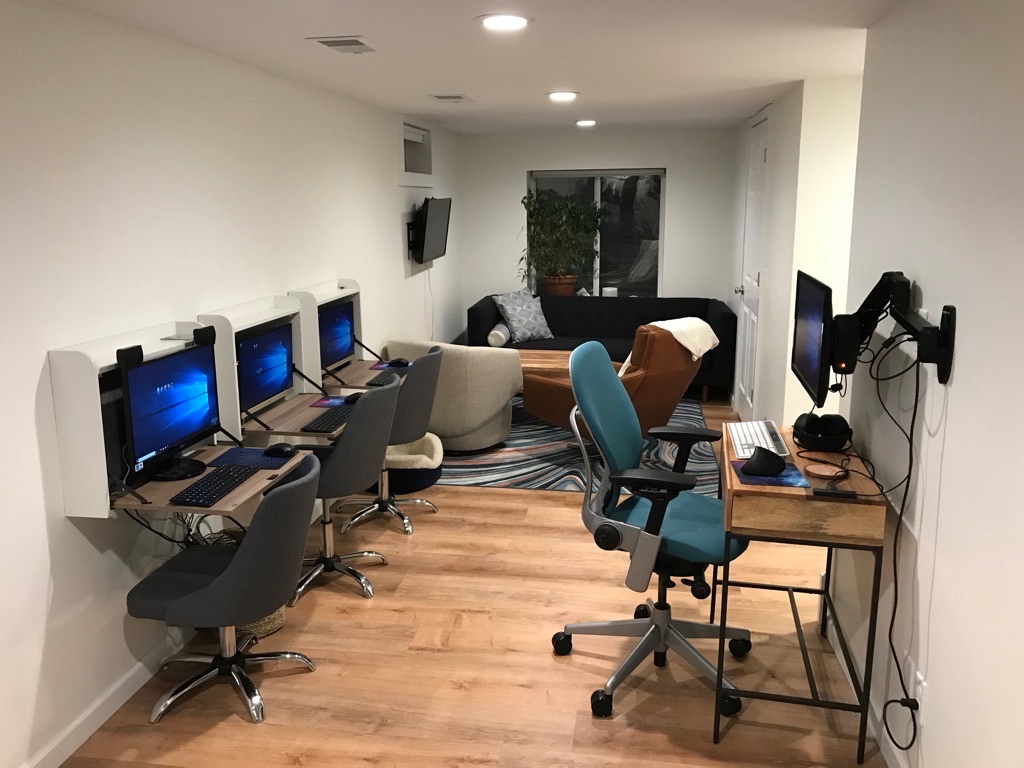
For the thin clients, we found some nice little desk/cabinets that just barely fit one of these thin monitors. I also ran some extra-long (active!) USB and DisplayPort cables from my utility closet to my primary gaming station (seen on the right). I had a custom wall plate made from DataPro so I can plug my monitor and peripherals right into a nice looking plate on the wall:
Final setup: (well ignore the station on the far left, as that one is using a temporary monitor/speakers while I’m waiting for my last monitor to arrive)
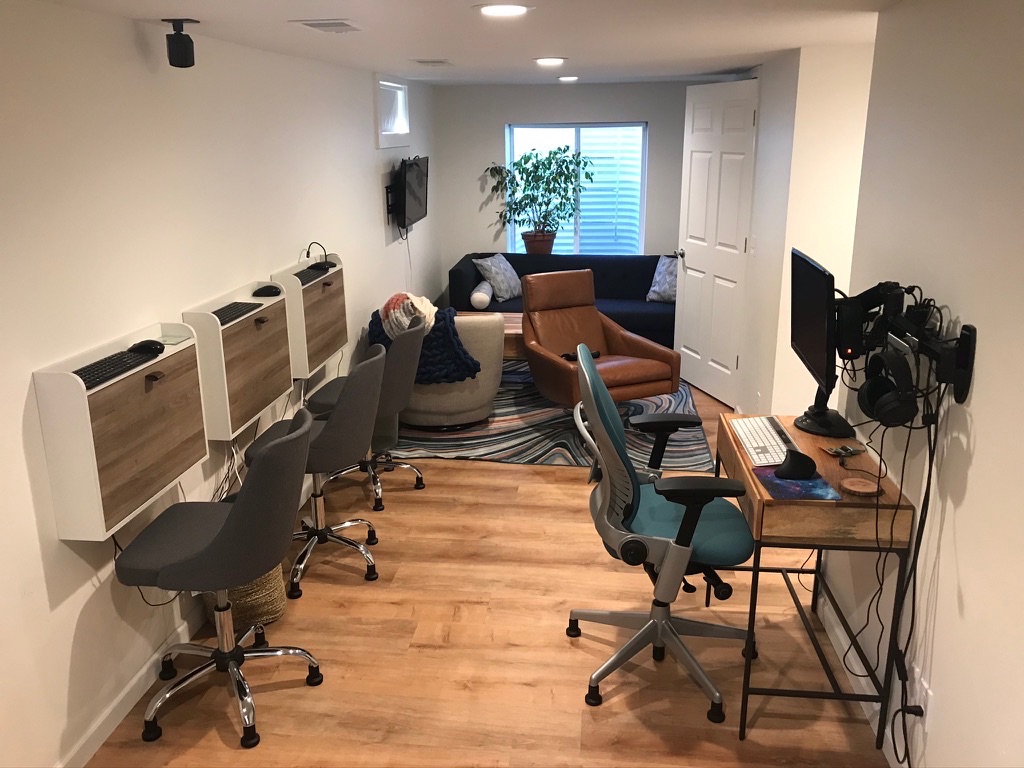
A picture taken today showing that the desk cabinets can be closed up when not in use:
4-player family game of Age of Empires II:
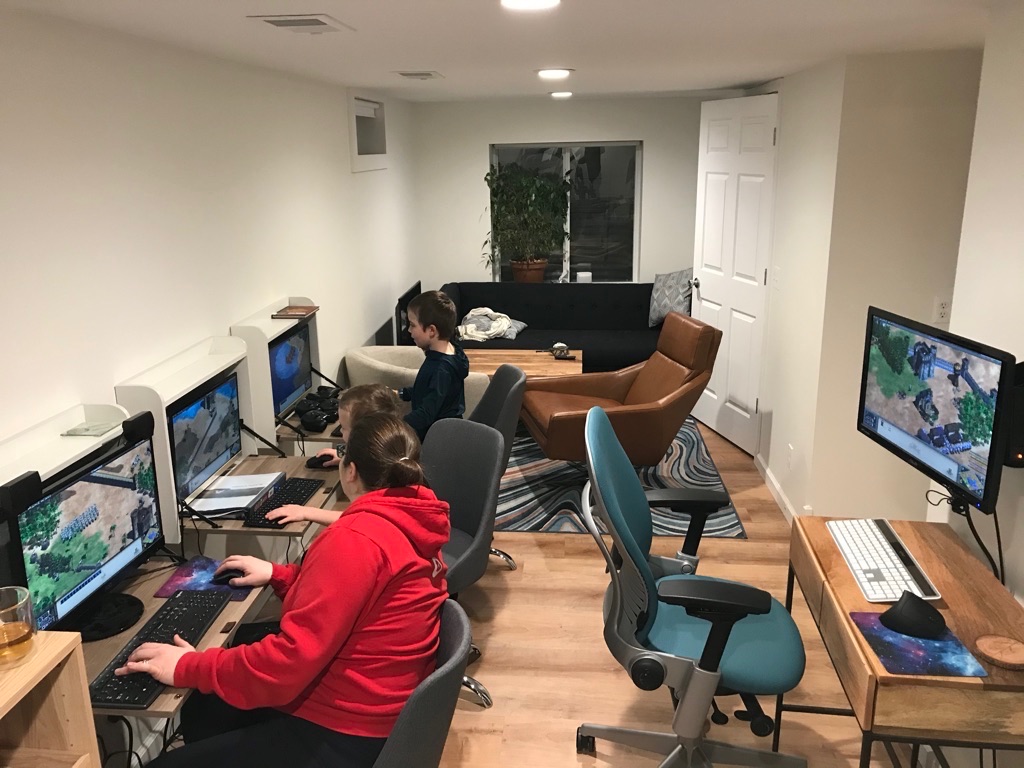
These VMs are major overkill for AOE2. Each of them have about 2x the CPU power of my old computer, and could all play something like Subnautica or Deus Ex: Mankind Divided all at the same time and still get 1080p @ 60fps framerates.
There was quite a bit of additional software/VM configuration to get optimal performance and to make sure that high load on one VM doesn’t cause degraded performance on another. But that’s probably a good topic for another post 🙂